Playing back songs
Play back your selected song.
When you select a song, the Player screen appears.
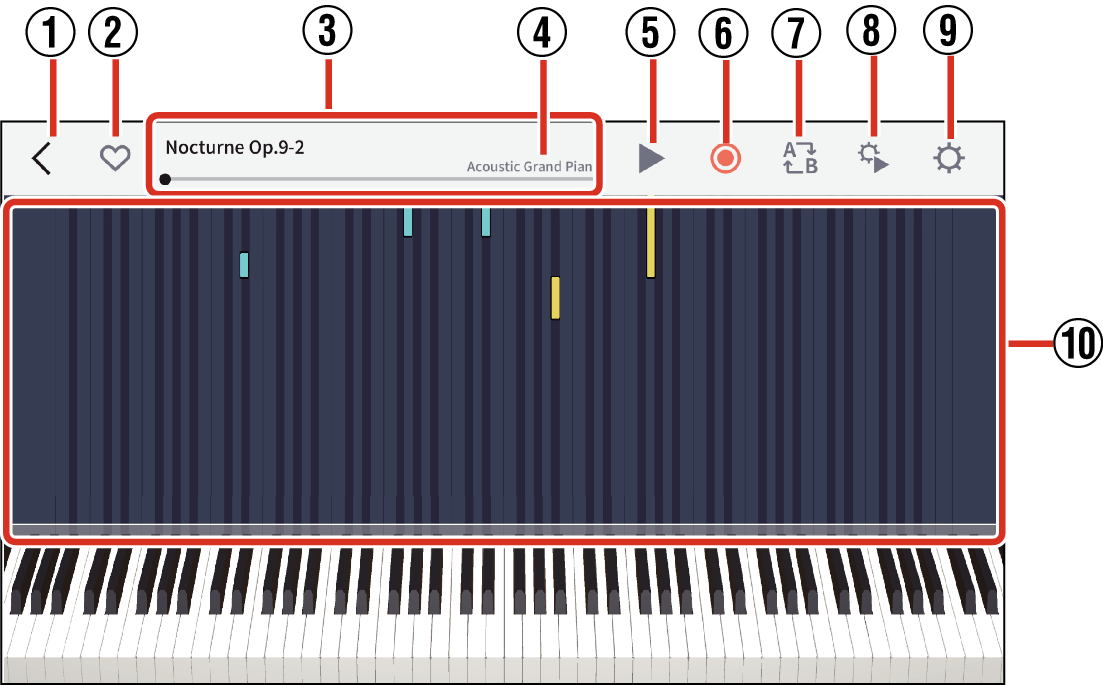
When choosing piano songs
Only the piano roll will appear.

- ①
-
Back button: Returns to the previous screen.
- ②
-
Favorite button: Tap to register the selected song in “Favorites”.
- ③
-
Song title/playback position bar: Shows the name of the current song and its playback position.
You can play a different part of the song by sliding the playback progress bar left or right.
- ④
-
Tone name display: Displays the instrument tone currently being used during playback.
- ⑤
-
Play/Pause button: Starts and pauses song playback.
- ⑥
-
Record button: Records your performance.
- Cannot be used during song playback.
- ⑦
-
AB Loop button: Displays the looped playback start (point A) and looped playback end (point B) positions on the playback position bar.
- Cannot be used during song playback.
- ⑧
-
Playback Settings button: Displays the Playback Settings screen.
- ⑨
-
Settings button: Displays the Performance Settings screen.
- Cannot be used during song playback.
- ⑩
-
Piano Roll Display: Displays the piano roll for the right and left hands for use during song playback and so on.
- You can change the keyboard display position by swiping left or right.
- You can change the width and the number of keys shown for pinch in/out.
- This is intended purely for reference while performing and the lengths and timing may differ from those in the original score.
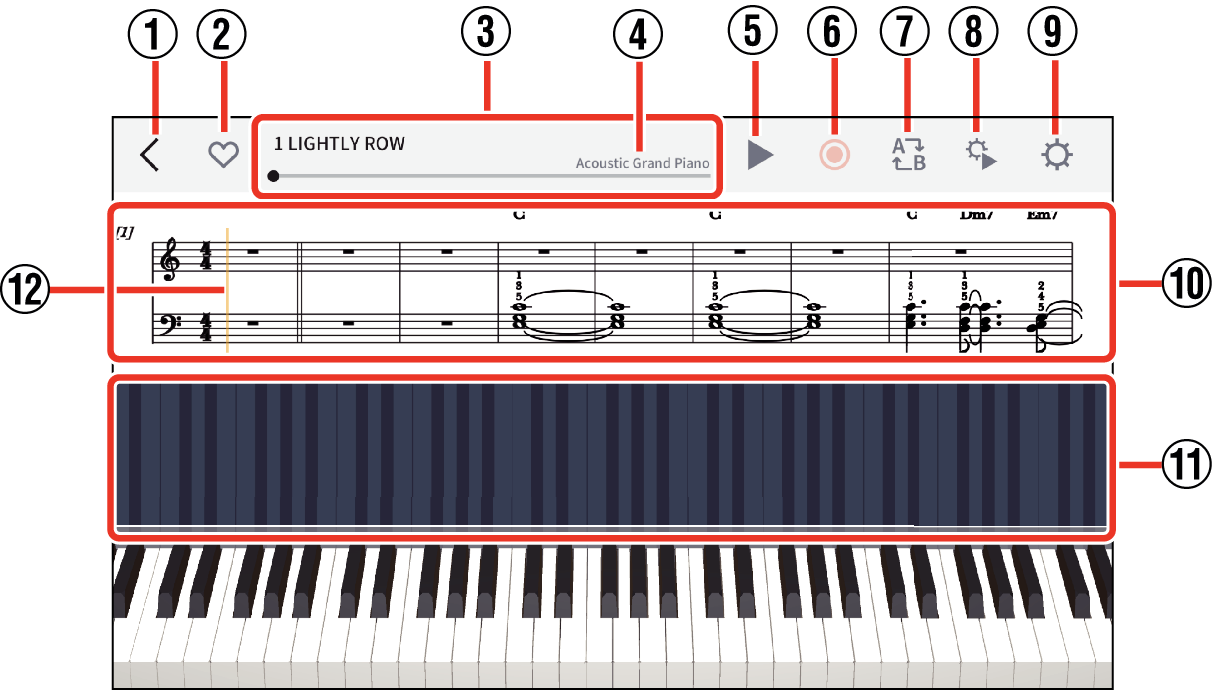
When selecting keyboard songs
The MIDI sheet music and piano roll will appear.

- ①
-
Back button: Returns to the previous screen.
- ②
-
Favorite button: Tap to register the selected song in “Favorites”.
- ③
-
Song title/playback position bar: Shows the name of the current song and its playback position.
You can play a different part of the song by sliding the playback progress bar left or right.
- ④
-
Tone name display: Displays the instrument tone currently being used during playback.
- ⑤
-
Play/Pause button: Starts and pauses song playback.
- ⑥
-
Record button: Records your performance.
- Keyboard songs cannot be used with this operation.
- ⑦
-
AB Loop button: Displays the looped playback start (point A) and looped playback end (point B) positions on the playback position bar.
- Cannot be used during song playback.
- ⑧
-
Playback Settings button: Displays the Playback Settings screen.
- ⑨
-
Settings button: Displays the Performance Settings screen.
- Cannot be used during song playback.
- ⑩
-
Sheet music display: Displays the sheet music for the song currently playing.
- ⑪
-
Piano Roll Display: Displays the piano roll for the right and left hands for use during song playback and so on.
- You can change the keyboard display position by swiping left or right.
- You can change the width and the number of keys shown for pinch in/out.
- This is intended purely for reference while performing and the lengths and timing may differ from those in the original score.
- ⑫
-
Music cursor: Indicated the current position of the song currently playing.
Playing back songs
-
1.Tap the Play/Pause button
-
- Playback begins
- To stop playback, tap the Play/Pause button.
Repeat playback
You can select repeat playback for an entire song or just part of a song.
Use this procedure before playback begins or while playback is stopped.
-
1.To set the starting position for looped playback, slide the slider on the playback position bar to the position of your choice and tap the AB Loop button.
-
- The “A” icon appears on the playback progress bar.
-
2.Slide the slider on the playback position bar to the ending position for looped playback of your choice and tap the AB Loop button again.
-
- The “B” icon appears on the playback progress bar.
-
3.Tap the Play/Pause button
-
- Repeat playback begins for the section between points A and B.
- To cancel AB Repeat, tap the AB Repeat button while playback is stopped.

 Top of page