
Recording
Instant recording
-
Just touch the Record button to start recording.
Recordings are saved in the Home folder and file names are automatically assigned with the date appended.
Specified recording
-
The app starts up in "Record" mode
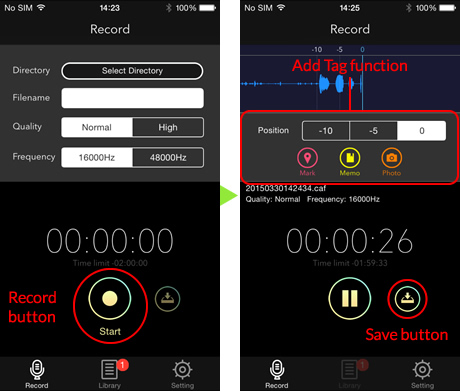
Touch "Select Directory" for the file name to specify the directory in which the recording is saved.
In this mode, you can set the file name and the recording quality. -
Then enter the file name.
Touch the box to the right of "File name" to open a text input box and then enter the file name. -
Set the sound quality.
During recording, you can insert tags (marks, memos or camera images). When recording is completed, touch the Save button to save the recording to the library.
Select "Normal" or "High" in "Quality" and then select either "16,000 Hz" or "48,000 Hz" in "Frequency".
This completes the settings. Touch the Record button to start recording.
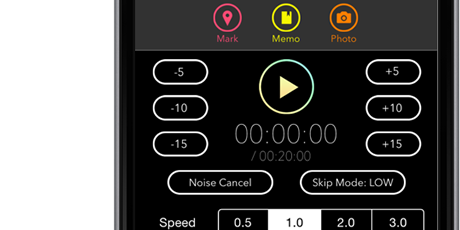
Record mode
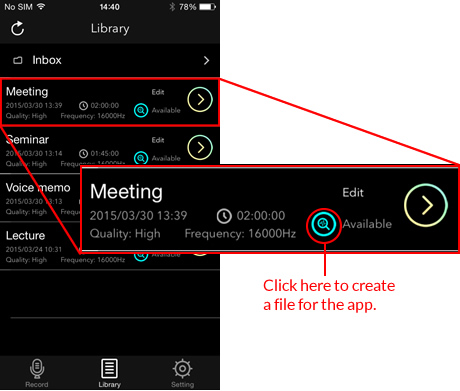
Accessing the library
- In Library mode, touch the Details button in the file list to switch to the File Details Interface.
- In the File Details Interface, you can use features such as the Tag function, Skip Seconds function, the Silence Skip function and the Variable Speed Playback function to listen back to your recordings more efficiently.
Library mode
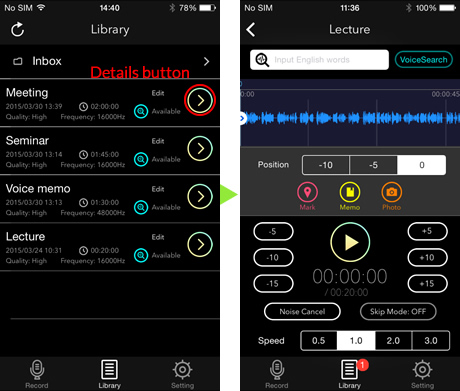
• File list Interface
• File Details Interface
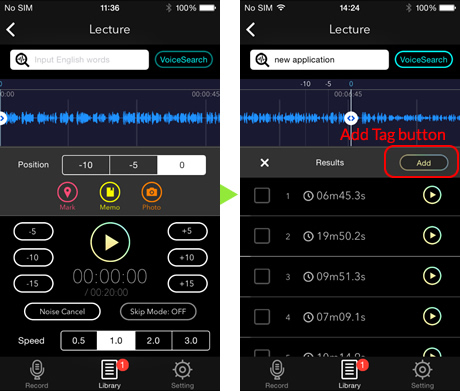
Using English Keyword Search
-
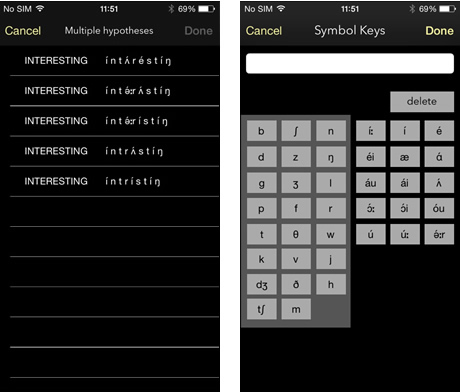
Type in the English words (or enter its phonetic symbols) in the search box.
-
Touch the Search button to start the search.
After a few seconds, the list of results appears. - Touch the Play button in each cell to check that the desired keyword has been found.
- To save the results, place a tick in the checkbox for the cell.
-
When you have ticked all the results you want to keep, touch the Add Tag button. The selected results are added as tags above the sound wave.
*1 If there are multiple phonetic symbols for the entered term, the phonetic symbol selection screen appears.
*2 You can also enter keywords using phonetic symbols.
• File Details Interface
• Search results Interface
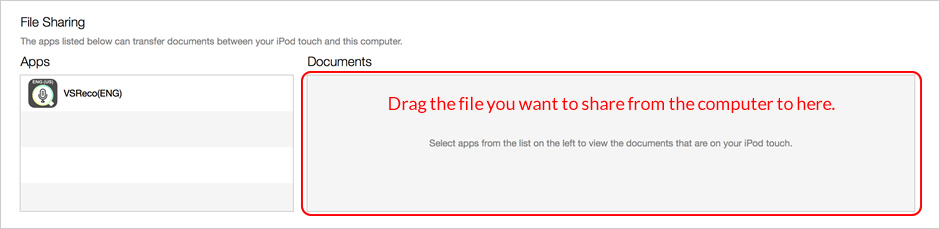
Importing Audio Data
Importing via a computer
- Connect your iPhone or iPod touch to a computer.
- Launch iTunes on the computer.
- In iTunes, select your iOS device from "Devices".
- Click the "Apps" tab and scroll down to the bottom of the page.
- In the "File Sharing" section, drag and drop the file into the "Documents" pane for "Keyword Search Voice Recorder".
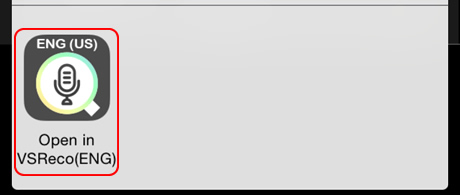
File sharing function
- In another app that has a file sharing function, select the file and click the Share button.
- In the list of apps that can share files, select "Search Recorder".
- Keyword Search Voice Recorder automatically starts up and you switch to that screen.
-
The imported file is saved in the Keyword Search Voice Recorder ”Imported (System)” folder.
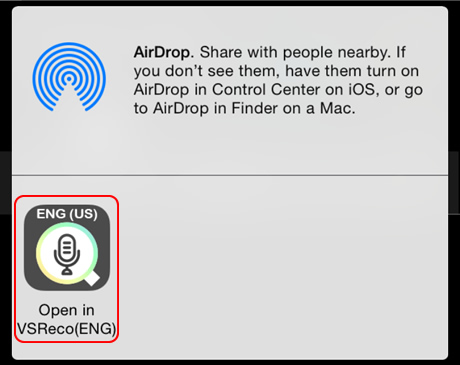
Importing audio files using AirDrop
- In another app that has a file sharing function, select the file and click the Share button. (Sender)
-
Select the AirDrop recipient.
* If the AirDrop recipient is not shown, check the recipient's AirDrop settings. (Sender)
- When the "Someone wants to share XXXX" dialog box appears, select "Accept". (Recipient)
- When the apps list for receiving files appears, select "Search Recorder". (Recipient)
-
The imported file is saved in the Keyword Search Voice Recorder ”Imported (System)” folder. (Recipient)
* To set AirDrop to ON, Wi-Fi and Bluetooth® must also be turned on.
•File for the app creation